Showing posts with label SBF (South Beach Friendly). Show all posts

Monday, April 5, 2010

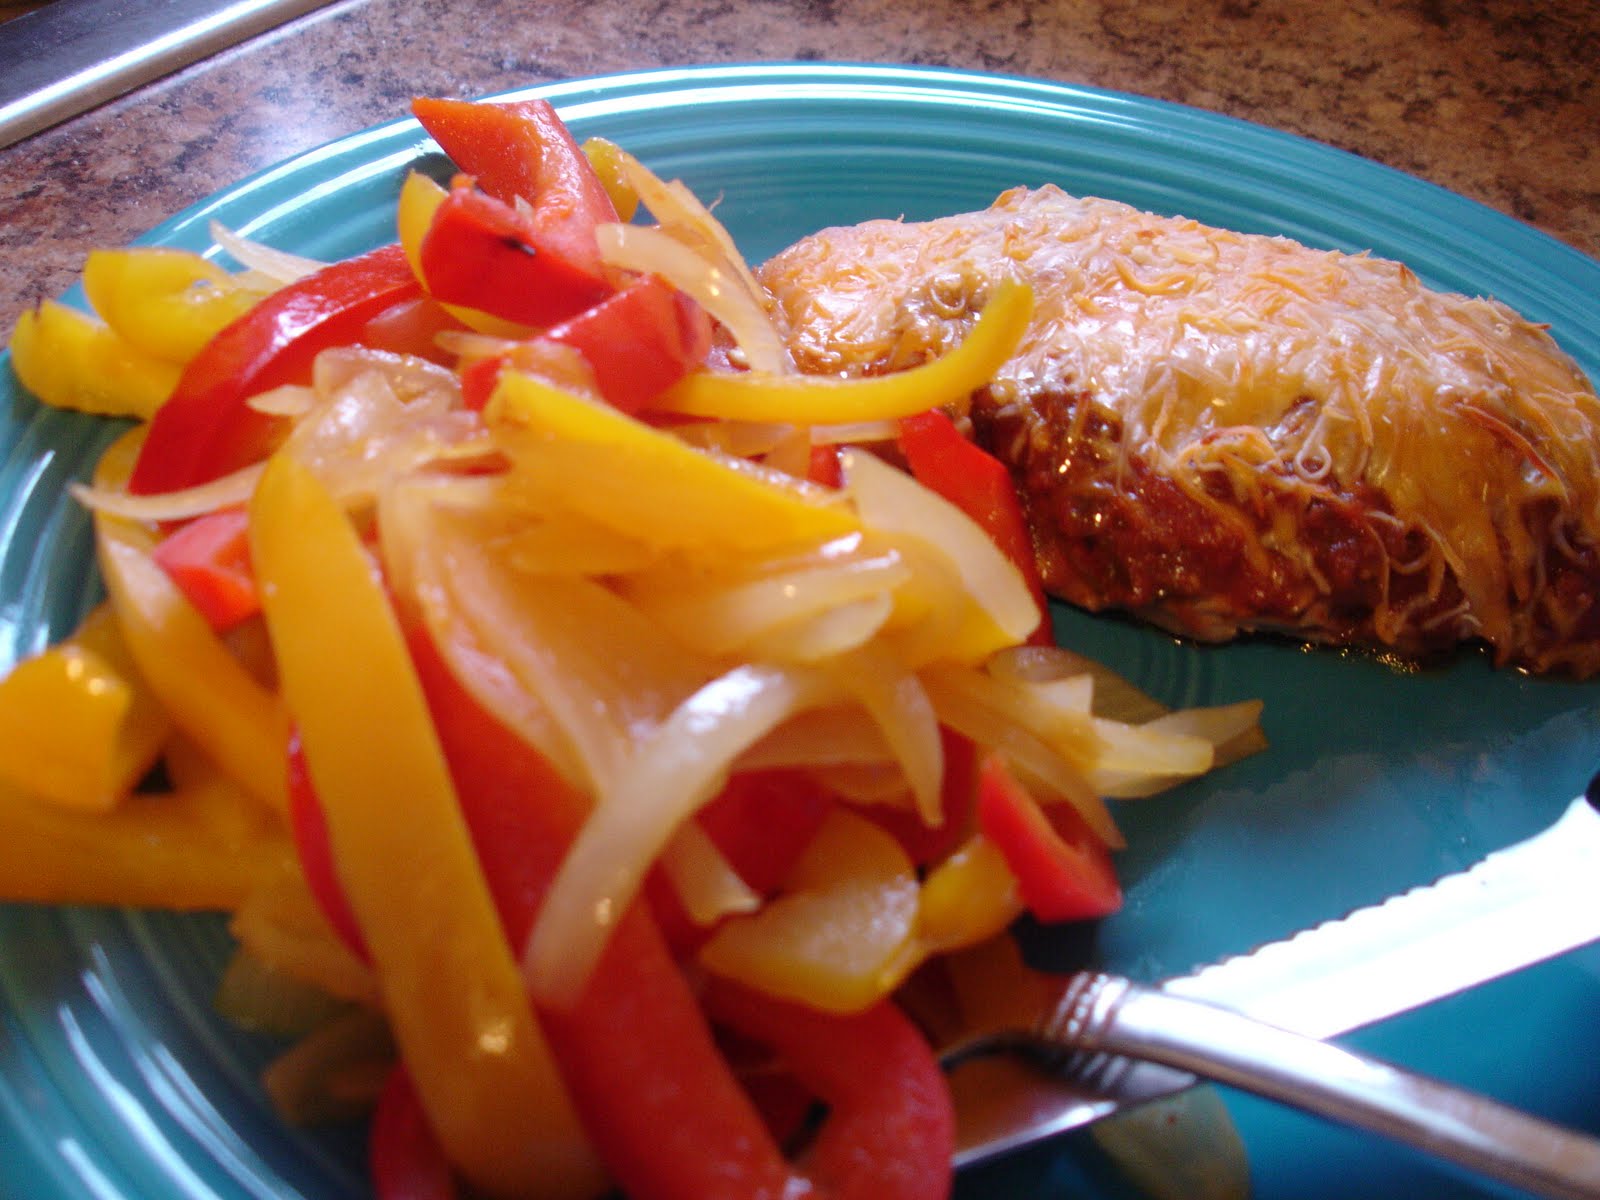
Salsa Chicken & Sweet-Sour Peppers


While I gravitate to multiple step, complicated recipes, sometimes it's nice to throw dinner in the oven and sit down while it cooks. Adventures in the kitchen are good for lazy days, but sometimes you need to get food on the table RIGHT NOW.

Three ingredients, thirty minutes, 1 pan.

Ready? Of course you're ready.

Salsa Chicken

1 1/2 cups of your favorite salsa (I used Roasted Garlic Salsa from Trader Joe's)
2 defrosted, trimmed chicken breasts
1 cup shredded light cheese (I used a mexican blend)

Preheat oven to 350. Get out an 8x8 Pyrex baking dish. Don't grease it! You don't need to. I said this was easy!

Add the chicken. Here's a helpful tip- just defrost the chicken in this pan. That way you have even less to clean up.


Top the chicken with the salsa. Layer with cheese. Make sure the chicken is fully covered- any exposed parts may burn.

Bake for 30 minutes or until juices run clear and the top is golden brown.

I serve this alongside Sweet-Sour peppers. Again, this couldn't be simpler and requires minimal supervision.

Sweet-Sour Peppers

2 medium bell peppers, sliced into strips
1 medium red or white onion, sliced into strips
*Note: Try to keep all strips the same size so they'll have a similar cooking time.
Salt
Vinegar- I used white balsamic, but you could use regular balsamic, apple cider vinegar- plain white vinegar would work fine, too.

Heat one tablespoon of olive oil over medium heat in a saute pan (the one with sides). Chop up 2 bell peppers and 1 medium onion. Toss them into the pan and season with a three-fingered pinch of salt ~1/4 tsp. Saute until soft and a bit brown. Add in roughly two tablespoons of vinegar- twice around the pan in Rachael Ray measuring. Let it bubble and reduce to fully coat the veggies. Cook another 2-3 minutes and serve hot.

This meal feels like cheating because it's so easy, but it always satisfies. Get creative and swap the salsa for pizza sauce for Pizza Chicken or chutney for Indian Chicken. This recipe practically begs for improvisation- enjoy!

Thursday, March 18, 2010

Granola Cookies


After a day of indulgence, I like to reconnect with my inner-hippie. She's very zen, only wears flip flops, and talks long walks in the sunshine.

She loves these cookies.

Full of rolled oats, sunflower seed butter, and sweetened only with agave, these are cookies you can feel good about. Eat one...or four.

For some added adventure, you could add a half cup of dried fruit, dark chocolate chips, or use almond or peanut butter instead of the sunflower seed butter. I have a feeling this is a forgiving batter.


If you're feeling really frisky, dunk them in a glass of almond milk. I won't tell.


Granola Cookies

1 cup rolled oats
1/2 cup whole wheat flour
1/2 cup sunflower seed butter
1/4 cup agave
1 egg
1/2 tsp baking powder
pinch salt

Preheat oven to 350 degrees.

Mix all ingredients in a bowl until thoroughly combined.

Drop rounded tablespoonfuls onto a cookie sheet. Use a fork to gently flatten them to about 1/2 inch thick.

Bake 12 minutes- rotating cookie sheets midway through baking.

Makes ~27 cookies

Tuesday, March 16, 2010

Raspberry Pecan Streusel Bars


At our 24 watching party last night, guests noshed on eggplant dip, Trader Joe's style "Doritos", salsa, and raspberry pecan streusel bars. This hodge podge was a combination of leftovers from our Mid East feast dinner (falafel, "baba ghanoush", pita, & salad) and my recent adventures into low-glycemic baking.

Even though this final season of Jack Bauer-antics has been a thorough disappointment, these tasty South Beach friendly treats delivered big flavor. The combination of lemon and raspberry balances the hearty, slightly sweet dough bursting with toasted pecans.

The use of whole wheat flour and agave nectar make this South Beach friendly. There is a bit of butter, so it would best be enjoyed as an occasional phase 2 or 3 treat. Choose a raspberry jam that is low-sugar or sweetened only with fruit juice.

I knew these were a hit when the husband refused to take the remaining bars to work so that he could have them all to himself. Greed is a good sign.

Raspberry Pecan Streusel Bars

2 cups whole wheat flour
1 cup pecans
1/2 tsp cinnamon
Pinch salt
1 tbsp lemon zest
1/4 cup butter, diced
1/4 cup agave nectar
1/4 cup oil
1 large egg yolk
1 tsp vanilla

3/4 cup raspberry jam
1 tbsp lemon juice

Preheat oven to 350 degrees.

Combine the flour, pecans, lemon zest, salt, and cinnamon in a medium-sized bowl. Using your fingers work the butter into the flour/pecan mixture. The butter/flour clumps should be pea-sized, so that the flour, butter, and pecans are well-combined.

In a separate bowl, whisk the oil, agave, egg yolk, and vanilla until well-combined.

Add the liquid mixture to the dry mixture and stir together. The dough will be crumbly, which is what you are looking for.

Stir the lemon juice and raspberry jam together to thoroughly combine.

In an ungreased 9x13 pan pat 2/3 of the dough into an even layer. Spread the jam over the bottom layer leaving a 1/4 inch border. Sprinkle the rest of the dough on top- don't worry if the pieces don't touch.

Bake at 350 for 30 minutes. Check near the end as whole wheat flour browns (burns) much quicker than white flour.

Tuesday, March 9, 2010

Healthy Brownies?


Agave brownies posing next to the birthday card my mom made for Gilligan's 4th birthday!


Baked goods don't have to be naughty. In fact, with a few small tweaks you can health-ify (it's a word) most yummy things. Brownies, quick breads, and bar cookies are the most adaptable as they are the most forgiving. Cookies and cakes need more adjustments.

My favorite way to increase nutrition is to use whole wheat flour. This is a one to one substitute in most recipes.

Another easy substitution is applesauce for butter. A little richness is sacrificed, but overall it's hardly noticeable.

And the latest craze in my kitchen is agave nectar. It's like honey, but better for you. It's really low on the glycemic index, which means it doesn't cause your blood sugar to spike thus making you crave junk all day. Agave nectar is actually sweeter than sugar so you can use less and still achieve the same sweetness.

Agave Brownies
from Elle's New England Kitchen

1/2 cup applesauce
2/3 cup agave nectar
2/3 cup unsweetened cocoa powder (I use Hershey's Special Dark)
2 eggs
1 tsp vanilla (I usually omit this)
2/3 cup whole wheat flour
1/2 tsp baking powder
1/4 tsp salt
1/2 cup chopped, toasted nuts

Preheat oven to 325. Grease an 8 x 8 baking dish. In a small mixing bowl, add all ingredients and whisk to combine. Pour into the baking dish and bake 25-30 minutes.


These are dusted with powdered sugar- LIGHTLY- only because the box was still on the counter. Don't judge me.

Wednesday, February 24, 2010

Calabacitas

After a week of gorging ourselves at an all-inclusive in Cancun (Dreams), it was high time to reel the eating on in. The endless pina coladas and all-you-can guacamole settled themselves squarely on my belly. Why don't I gain weight in my boobs?? Curse you, genetics!

Last July, Nick and I decided to shake things up and do the South Beach Diet. I feel like calling it a diet sounds a bit silly because it wasn't something that we did, lost a whole bunch of weight, and then stopped. After we each lost some substantial weight , we've kept up the diet for our primary meals and snacks. Indulging had become perhaps a bit too common, but overall we didn't gain back much- just fluctuated a few pounds.

South Beach is really about living a low glycemic life style as much as possible. Low glycemic is a word often used in conjunction with diabetes as it's all about controlling your blood sugar. When you eat food that has sugar in it, your pancreas releases insulin. Too much sugar that isn't tempered by a complex carb, fat, or protein trains the pancreas to release insulin erratically, which only makes you want sugar more. It's a vicious cycle!

The benefit of this way of eating is that it allows you to take care of weight you carry in the middle first and foremost- hooray! Currently we're doing phase 1 which is the strictest phase, but it's hardly an imposition. I just snacked on some hummus and red bell pepper. Other snacks include spoonfuls of almond butter (straight from the jar if you're classy like me), low fat string cheese, pistachios, sugar-free jello. Not a lot of options, but I'm not a picky eater- I just don't want to be hungry!

South Beach encourages you to eat until you're full- hallelujah! The calorie/point/carb counting shenanigans really stresses me out. Suffice it say, South Beach works for us and if you're interested in learning more you should read this.

As I step away from my soap box, I'll get to explaining where I found this delicious dish. Kalyn's Kitchen is a blog dedicated to South Beach and healthy cooking in general. This recipe is taken directly from her blog with the exception of adding the El Fenix salsa at the end- that's all me.

Cast of characters: low-fat (NOT fat-free) shredded cheese, 4 oz. green chile (you could use some jalapenos if you're feeling spicy), diced onion (1 small), chopped summer squash and zucchini (4 medium-sized squash)

This is a picture of my "YELLOW" onion that has a decidedly pinkish hue. It's a conspiracy!

Saute the onion in about 1 tablespoon of oil over medium heat. Wait for it to get a little color and for onions to be soft.

Dump in the squash and saute until it's tender crisp.

Throw in the green chile and stir to combine.


Add a few generous handfuls of cheese.

Stir to combine and allow cheese to melt.

Then stir in several tablespoons of ambrosia, a.k.a. El Fenix hot sauce. If you ever happen to be in my hometown of Dallas, TX you should eat there. Might I recommend the Wednesday Enchilada Special...*drool*


Serve alongside some tilapia or other lean protein. For some reason, I am unable to make fish on the stove top that doesn't look like mangled cat food.


If you have any helpful tips, please let me know because my pans look like this after I cook fish. Boo.

Head over to Kalyn's slice of cyberspace for the full recipe and many more tasty treats!

Thursday, February 11, 2010

Sausage & Cannelini Beans in the Crock Pot

It's not all about desserts in the BettyCupcakes kitchen- we eat dinner, too!

Yesterday, during the blizzard that wasn't (4 inches does not a blizzard make), I pulled out my trusty Crock Pot to set it and forget it. Remember those RonCo commercials?? Good times.

For this recipe, you'll need the following ingredients:

~1 lb dried cannelini beans
4 links sausage (I used Sweet Basil Pesto Smoked Chicken & Turkey Sausage from Trader Joe's), sliced into 1-inch rounds
1 onion, chopped
2 cloves of garlic, minced
2 tsp dried basil
1/4 tsp pepper flakes
Several grinds of black pepper
2 dry bay leaves
4 cups chicken stock

To start, you'll want to soak the beans. If you good at planning ahead, you could put the beans in a large saute pan, cover with an inch or 2 of cold water, cover with a lid, and put in the fridge overnight. Drain the beans and proceed with recipe.

However, if you're like me, you need a quick soak method.

Quick soak is a bit of a misnomer- it still takes 2 hours. BUT it's a fast(er) way to get those beans ready for their slow cooking. This method is from Lynn Rosetto Kasper (of The Splendid Table fame).

Place beans in a large saute pan that has a tightly fitting lid. Pour boiling water over the beans so that they are covered by an inch or two of water. Place lid on securely and leave on counter for two hours. Drain beans and proceed with recipe.

In a 6 quart slow cooker, put the drained beans, onion, sausage, garlic, basil, pepper flakes, and black pepper.


Pour in the chicken broth, and stir so that all ingredients are submerged in liquid. Place top on securely and set the heat.


You'll need to cook it for 11-12 hours on low or 5-6 hours on high. Since the sausage is already fully cooked, you're just looking for the beans to be tender and the flavors to blend.

The best thing about this recipe is that it is SO adaptable. Substitute any kind of bean or sausage and use the same amount of liquid. You could even use canned beans- just shorten the cooking time so they don't turn to mush.

I serve this over sauteed cabbage. Add one bag of shredded cabbage to a tablespoon of olive oil in a pan over medium heat. Sprinkle with 1/4 tsp of salt and a couple grinds of pepper. Cook until the cabbage is wilted and has a bit of color (10-15 minutes) tossing occasionally.

This hit the spot after a LONG day of waiting for snow- the husband and 1 each had two servings!

Thursday, February 4, 2010

Roast turkey with braised brussel sprouts

Has anyone seen that Perdue commercial about the mom who has "roasterphobia"?

See this if you haven't.

Anyways, the premise is that roasting poultry is SO scary and hard to do, and now Perdue has come in with its pop up timer to make sure that we never have to think again.

Boo to the pop up timer! Roasting is NOT THAT HARD. I swear. You must try it- preferably with some good turkey breast. I bought my kosher split turkey breast from Trader Joe's. It comes presoaked and salted (think- brined), which helps keep it juicy.

Nigella is the one who helped me understand the key to good roast chicken/turkey. You should
read this:

It will teach you the basics in such a conversational and easy to understand way. It's more than just recipes- it's part-diary, part-encyclopedia, part-cookbook. It's my go-to guide for most cooking questions...my modern Joy of Cooking (a book I don't own and probably won't ever).

At any rate, I could discuss my girl-crush on Ms. Lawson ad nauseum, but I'll move onto the turkey.

Roast chicken basics: 400 degree oven, 15 minutes per pound + 10 minutes. Use a meat thermometer if you're really skittish- meat should register 165 (the FDA says 180- use your own discretion).


You'll need the following:

Split turkey breast- mine is 2.4 lbs
Olive oil
Sea Salt (I said goodbye to Morton's sometime circa 2003)
Pepper
Roasting pan with rack
*Note- if you don't have a roasting pan, don't rush out an buy one. If you have a cookie sheet/jelly rolly pan (gotta have some sides to catch the grease) & a cookie cooling rack, you could substitute those. Heck, you could skip the cooling rack altogether and put this turkey directly on the cookie sheet, but the rack will help with the circulation of heat & provide more even roasting.

Here's how I do it:

Before you unwrap the turkey- do this:
Preheat the oven to 400- you will have this turkey breast prepped before the oven is ready to go- it's THAT fast.
Put some oil (eyeball a 1/4 cup) in a bowl. Add a few generous pinches of sea salt and 4-5 grinds of black pepper.


Place bowl inside the roasting pan.


I swear- there is a method to my madness!


THEN, and only then, unwrap the turkey breast and place it on the rack next to the bowl.

Don't bother with rinsing it- I never do.

Why is the olive/salt/pepper paste prepared in advance and placed in the rack?

For ease of use, of course.

Once you touch that raw bird, your hands need to keep off any other surfaces to avoid cross-contamination. With the oil mixture pre-mixed and in the pan, you can scoop/pour/rub the turkey breast to your hearts desire without icking up anything else.

Now, gently separate the skin from the meat. Pour some of the oil/salt/pepper under the skin and rub it around. Pour some on top of the skin and rub that in- pretend you're putting sunscreen on a fair maiden- you want to make sure you cover all the important bits. Now, flip the breast over, and add some of that good oil on the bottom- it needs love, too.

It should look like this when you're done oiling it up:


Move to the sink and scrub those hands BEFORE putting the pan into the oven. I was watching Food Network the other day and Anne Burrell was touching everything with her raw turkey-juiced hands- EW!

After you're cleaned up, place the pan in the middle of the oven, set the timer for 60 minutes and take the dog for a walk.


After coming in from the cold, and once there are about 20 minutes left on the clock, start your brussel sprouts.

I know, who eats brussel sprouts any more? Didn't they go the way of lima bean?

No, and here's why. When prepared properly (read- braised), they.are.delicious. Sublime, even.

Prep ~12 oz. of sprouts. If your brussel sprouts are large, slice in half. In a large saute pan, add 2 tablespoons of olive oil and heat on medium until shimmering slightly.

Add brussels.

Let them get some color, stirring occassionally. You want to brown the outside to give them some depth of flavor and bring out their natural nuttiness.


Color on brussel sprouts looks like this:

See that gorgeous sprout in the lower right hand corner? You want that on 80% of the sprouts before you move to the next step.

Once you've achieved proper brussel browning, add ~1/2 cup chicken broth. Immediately cover with the lid and let brussels steam and get tender for 5-10 minutes.

Uncover, sprinkle with a bit of sea salt, and add a pat of butter (think a tablespoon). This butter step is optional, but it creates a luscious glaze that coats the sprouts and makes them even more irresistible. Scouts Honors.

In the end, the brussel sprouts look like this:


You will like these brussel sprouts, even if you are a skeptic. Even if you don't like food, you will like these sprouts. My mother-in-law, who only loves Cameo cookies, sneaks these out of the pan before dinner.


By now, your turkey should be done. I'd show you a picture of that finished product, but the husband came home and promptly stripped the bird of all it's crunchy skin, leaving it naked and less than photo-ready.

Let turkey breast stand at least 10 minutes before carving to let the juices redistribute- again, this keeps it juicy.

We ate this last night and drank some 2 buck Chuck Cabernet alongside. Very classy, indeed.