Wednesday, February 24, 2010

Calabacitas

After a week of gorging ourselves at an all-inclusive in Cancun (Dreams), it was high time to reel the eating on in. The endless pina coladas and all-you-can guacamole settled themselves squarely on my belly. Why don't I gain weight in my boobs?? Curse you, genetics!

Last July, Nick and I decided to shake things up and do the South Beach Diet. I feel like calling it a diet sounds a bit silly because it wasn't something that we did, lost a whole bunch of weight, and then stopped. After we each lost some substantial weight , we've kept up the diet for our primary meals and snacks. Indulging had become perhaps a bit too common, but overall we didn't gain back much- just fluctuated a few pounds.

South Beach is really about living a low glycemic life style as much as possible. Low glycemic is a word often used in conjunction with diabetes as it's all about controlling your blood sugar. When you eat food that has sugar in it, your pancreas releases insulin. Too much sugar that isn't tempered by a complex carb, fat, or protein trains the pancreas to release insulin erratically, which only makes you want sugar more. It's a vicious cycle!

The benefit of this way of eating is that it allows you to take care of weight you carry in the middle first and foremost- hooray! Currently we're doing phase 1 which is the strictest phase, but it's hardly an imposition. I just snacked on some hummus and red bell pepper. Other snacks include spoonfuls of almond butter (straight from the jar if you're classy like me), low fat string cheese, pistachios, sugar-free jello. Not a lot of options, but I'm not a picky eater- I just don't want to be hungry!

South Beach encourages you to eat until you're full- hallelujah! The calorie/point/carb counting shenanigans really stresses me out. Suffice it say, South Beach works for us and if you're interested in learning more you should read this.

As I step away from my soap box, I'll get to explaining where I found this delicious dish. Kalyn's Kitchen is a blog dedicated to South Beach and healthy cooking in general. This recipe is taken directly from her blog with the exception of adding the El Fenix salsa at the end- that's all me.

Cast of characters: low-fat (NOT fat-free) shredded cheese, 4 oz. green chile (you could use some jalapenos if you're feeling spicy), diced onion (1 small), chopped summer squash and zucchini (4 medium-sized squash)

This is a picture of my "YELLOW" onion that has a decidedly pinkish hue. It's a conspiracy!

Saute the onion in about 1 tablespoon of oil over medium heat. Wait for it to get a little color and for onions to be soft.

Dump in the squash and saute until it's tender crisp.

Throw in the green chile and stir to combine.


Add a few generous handfuls of cheese.

Stir to combine and allow cheese to melt.

Then stir in several tablespoons of ambrosia, a.k.a. El Fenix hot sauce. If you ever happen to be in my hometown of Dallas, TX you should eat there. Might I recommend the Wednesday Enchilada Special...*drool*
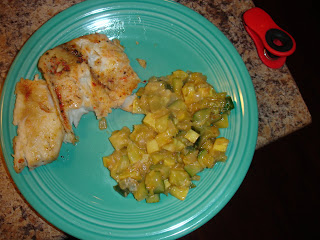

Serve alongside some tilapia or other lean protein. For some reason, I am unable to make fish on the stove top that doesn't look like mangled cat food.


If you have any helpful tips, please let me know because my pans look like this after I cook fish. Boo.

Head over to Kalyn's slice of cyberspace for the full recipe and many more tasty treats!

Poaching 101

My pink converse were on the case…

It was time to tackle poaching.


Burtons Grill is a popular restaurant with locations in Massachusetts, Virginia, & Connecticut. Their focus is on fresh food, specializing in seasonal & quality ingredients. To showcase their Valentine’s Day menu, Executive Chef Danny Azzarello & sous chef Envaldo Carmo from the Hingham location wowed a crowd at Williams-Sonoma.


On the menu were lobster tails poached in a lemon butter sauce and Bosc pears poached in port wine. According to cheftalk.com, “the definition of poaching is ‘to cook an item by submerging it in a liquid that is just barely simmering.’" The temperature of the cooking liquid must be closely monitored. Using a digital thermometer should give you an accurate read.


Shallow submerging, or poaching, happens at a temperature of 160 degrees. A lemon butter sauce has been prepared with shallots, white wine, and heavy cream. Heating the liquid prior to preparing the lobster tails ensures a smooth preparation. Complete recipes for the lobster and pears from Denise Baron, the Culinary Director of Burtons Grill, are included at the end of this post.


Chef Azzarello then demonstrated how to prepare the lobster tails. As he noted, you could just rip the meat out and throw it in, but since he works at a restaurant it’s his job to make food look good, too.

Using kitchen shears, he cuts in a straight line down the back of the lobster.


Pulling the two pieces of shell apart carefully, he pulls the meat partially out of the lobster tail. Be careful not to fully remove the lobster tail.


The lobster meat should rest on top of the tail. This is important for presentation.


Place the prepared lobster tails in the simmering sauce. Place lid on. Poach until fully cooked.


The final result is not only gorgeous...it's delectable! When the lobster was passed around, I confess that I took the biggest bite. How often do you get free lobster?? The lobster is perfectly cooked, silky in texture, with citrus notes. There's a slight chew to the meat, but it's not rubbery at all. The butter sauce is rich, but not overpowering.


Next up...poached pears.


This is a Bosc pear. Burtons Grill uses Bosc pears because they are much bigger and have a firmer texture. This firm texture ensures that they don't fall apart during poaching.


The pears are poached in a port, water, sugar combination. Deep submerging, or poaching at 180 degrees, is used for pears as they are far less delicate.


While the pears poached, sous chef Carmo prepared a salad of arugula & spinach, topped with a mustard vinaigrette, candied walnuts, and bleu cheese.


The freshly poached pears still had a nice bite, with a magenta exterior and a pale interior. Chef Azzarello had poached some pears the day before and brought those for comparison. They were much darker purple and had a more pronounced port flavor. When pre-poaching fruit, you can store it in the cooking liquid and keep for a few days.


I would go to Burtons Grill just to have this salad. The salty and sweet flavors were perfectly balanced, and the walnuts added a much needed crunch.


Even though Valentine's Day has since passed, Burtons Grill offers high quality, seasonally-inspired food year round. If you visit- let me know what you think!


Butter Poached Lobster

Yield: 5 servings

Tools Needed

Kitchen sheers, metal half pans with lids, wire racks, skewers

Ingredients

5- 6 oz. Canadian Lobster Tails

Method of Preparation

1. Bring water to a boil. Drop lobster tails in boiling water for 2 minutes, remove and place immediately in an ice bath.

2. Once cooled, using kitchen sheers, cut the upper shell of the lobster down to the tail, make a cut to the left and right of the tail so it is easier for the tail to come out.

3. Gently pull lobster tail out of shell but leaving it still intact at the bottom of the tail. The idea is to rest the met along the shell so it sits up higher. The tail will shrink when cooked so we need to cut down the shell by half.

4. Bring to a boil equal parts of lemon butter and water in a half pan. Place on a wire rack on the stove and cover with a plastic half pan lid. It should hold temp at 160- this is a great poaching temp.

5. When an order comes in, place a skewer down the tail, this is going to help the tail from curling up to nothing.

6. Drop tail in poaching liquid and set timer for 10 minutes. If you have a lot of tails going in at the same time they will need to longer to cook because they will lower the temperature of the poaching liquid. You might need to place direct on a stove to bring temp back up to 160.

7. After 10 minutes, check doneness of lobster tail. If not firm, cook for an additional 2 minutes and check again.

8. When done, place tail in a separate half hotel pain with a wire rack to catch any excess poaching liquid. This is the holding tank until tail is ready to sell.


Poached Pears


Yield: 32 slices= 10 orders

Tools Needed
saucepan, measuring cups and spoons, shallow plastic
1/3 pan with lid, tongs

Ingredients
4 Bosc pears, halved, cored (use 1/2 tsp.), then each half quartered
2 cups Warre's Warrior port
3 cups water
1/2 cup sugar

Method of Preparation
1. Combine port, water and sugar in saucepan. Stir well until sugar is dissolved.
Bring poaching liquid to boil.


2. Add pears and reduce heat to simmer. Cook for 7-15 minutes until pears
start to soften, turning at least once.


3. Pour pears and liquid into plastic 1/3 pan and allow to cool at room temperature.
Once cooled, cover, label, date and store in walk-in.


Note - Poaching liquid can be re-used once.
- Ripeness of the pears plays a big role in cook time. The more ripe
they are, the less time they need to poach. Please monitor carefully!

Thursday, February 11, 2010

Toasted Coconut Brownies

You must make these NOW.

I don't know why brownie mixes exist- brownies are SO easy and they require minimal ingredients. As long as you keep some cocoa powder on hand, you are probably ready to make these right now. And you should.

Buttery, crunchy, gooey...they've got it all.

You need the following ingredients to make some magic....

1/2 cup butter (1 stick)
1 cup sugar
2 eggs, beaten
1/3 cup unsweetened cocoa powder (I used Hershey's Special Dark)
1/2 cup AP flour
1/4 tsp salt
1/4 tsp baking powder
1 7 oz. bag flaked coconut
1/4 cup Eagle Brand sweetened condensed milk (oh the memories...this is like mother's milk if you're from Texas)

Preheat oven to 350. Grease an 8 x 8 square baking dish. I always bake with Pyrex.

In a medium sauce pan, melt the butter on low heat so it doesn't get too hot.


In a small bowl, whisk together the cocoa powder, flour, salt, and baking powder.


You should also use this time to make the coconut topping. In a separate bowl, combine the coconut and the Eagle Brand milk- mix with a fork until it is thoroughly moistened. You also may want to eat some of the sweetened condensed milk with a spoon....or maybe that's just me.

Remove the melted butter from the heat and stir in the sugar. Wait a minute or two to make sure the butter is cool. Then gently mix in the eggs.

Add the dry ingredients to the butter mixture and stir until just combined. Pour the batter into the prepared pan.

Top the brownie batter with the coconut mixture taking care to evenly distribute.


Bake 35-40 minutes at 350 until brownie is mostly set and coconut is toasty.


Unless you are planning to eat these out of the pan with a spoon, you'll need to wait until these are completely cooled to cut. Cut them using a serrated knife- helps slice through the crunchy topping without ripping it off.

Take a bite...moan in delight...repeat as needed or until you are out of brownies.

Sausage & Cannelini Beans in the Crock Pot

It's not all about desserts in the BettyCupcakes kitchen- we eat dinner, too!

Yesterday, during the blizzard that wasn't (4 inches does not a blizzard make), I pulled out my trusty Crock Pot to set it and forget it. Remember those RonCo commercials?? Good times.

For this recipe, you'll need the following ingredients:

~1 lb dried cannelini beans
4 links sausage (I used Sweet Basil Pesto Smoked Chicken & Turkey Sausage from Trader Joe's), sliced into 1-inch rounds
1 onion, chopped
2 cloves of garlic, minced
2 tsp dried basil
1/4 tsp pepper flakes
Several grinds of black pepper
2 dry bay leaves
4 cups chicken stock

To start, you'll want to soak the beans. If you good at planning ahead, you could put the beans in a large saute pan, cover with an inch or 2 of cold water, cover with a lid, and put in the fridge overnight. Drain the beans and proceed with recipe.

However, if you're like me, you need a quick soak method.

Quick soak is a bit of a misnomer- it still takes 2 hours. BUT it's a fast(er) way to get those beans ready for their slow cooking. This method is from Lynn Rosetto Kasper (of The Splendid Table fame).

Place beans in a large saute pan that has a tightly fitting lid. Pour boiling water over the beans so that they are covered by an inch or two of water. Place lid on securely and leave on counter for two hours. Drain beans and proceed with recipe.

In a 6 quart slow cooker, put the drained beans, onion, sausage, garlic, basil, pepper flakes, and black pepper.


Pour in the chicken broth, and stir so that all ingredients are submerged in liquid. Place top on securely and set the heat.


You'll need to cook it for 11-12 hours on low or 5-6 hours on high. Since the sausage is already fully cooked, you're just looking for the beans to be tender and the flavors to blend.

The best thing about this recipe is that it is SO adaptable. Substitute any kind of bean or sausage and use the same amount of liquid. You could even use canned beans- just shorten the cooking time so they don't turn to mush.

I serve this over sauteed cabbage. Add one bag of shredded cabbage to a tablespoon of olive oil in a pan over medium heat. Sprinkle with 1/4 tsp of salt and a couple grinds of pepper. Cook until the cabbage is wilted and has a bit of color (10-15 minutes) tossing occasionally.

This hit the spot after a LONG day of waiting for snow- the husband and 1 each had two servings!